Sunday, 30 June 2013

Numeric Functions in VB.NET


Numeric Funcitons provides various function to be operated on integer or numeric variables to get Required result. Main Numeric Functions in VB.NET are :-


1. Round Function :-The Round function is used for rounding numbers to the number of digits you want. It will replace number to its most nearest by rounding off it

Syntax:-  
Round ( expression , precession)

expression  :- expression is value which Round function will round
precession :- It denotes to how many digits you want after decimal point 

Example :-

Dim num1 as integer
Dim num2 as integer
num1 = 10
num2 = 3
Dim precession as integer
Msgbox (round ( num1 / num2 , precession ))

2. Int and Fix Function :- 
Int Function is used to drop fractional part of a positive number .
Fix Function is used to drop fractional part of negative number

Syntax :-
Int ( +/-  num1 / num2 )
Fix ( +/-  num1 / num2 )

Example :-

Dim num1 as integer
Dim num2 as integer
num1 = 10
num2 = 3
Msgbox ( Int ( num1 / num2 ))
Msgbox ( Int ( - num1 / num2 )
Msgbox ( Fix ( num1 / num2 ))
Msgbox ( Fix ( - num1 / num2 ))

When Int is used with negative number , it returns the next lowest whole number.

3. Abs Function :- The Abs function returns the absolute value of a number. It means it remove the negative sign of number and it always returns the positive value.

Syntax :- 
Abs ( num1 )

Example :-

Dim num1 as integer
Dim num2 as integer
num1 = 10
num2 = -10
Msgbox ( Abs ( num1 ))
Msgbox ( Abs( num2 ))

4. Rnd Function :- Rnd Function returns a single precision , random numbers between specified value Range. 
Syntax :- 
Rnd * value

Exmple :-

Dim Random_number as integer
Random_number = Rnd * 5     ''It will produce Random numbers between 0 to 5
Msgbox ( Random_number )

5. Sgn Function :- This Function returns 1 for any positive number , -1 for any given negative number and 0 for zero number . 

Syntax :- 
Sgn ( number )

Example :-

Dim num1 as integer
Dim num2 as integer
Dim num3 as integer
num1 = 20
num2 = -20
num3 = 0
Msgbox ( sgn ( num1 ))
Msgbox ( sgn ( num2 ))
Msgbox ( sgn ( num3 ))

6. Sqr Function :- This Function returns the square root of number or specified number

Syntax :-
Sqr ( number )

Example :-

Dim num1 as integer
num1 = 10
Msgbox ( sqr ( num1))

7. Hex And Oct Function :- 
Hex Function returns hexadecimal equivalent of a decimal number 
Oct Function returns octal equivalent of decimal number

Example :-

Hex ( 12 )    ' returns a value C
Hex ( 2658  )    ' returns a value A62
Oct ( 19 )        ' returns a value 23
Oct ( 109 )        ' returns a value 135

8. Max Function :- Max Function is used several times in programming environment. Max Function returns maximum number from two numbers given as arguments to Max Function . This Max Function is applicanle for only two numbers not for more than two numbers 

Syntax :
Max ( number1 , number2 )

Example :-

Dim num1 as integer 
Dim num2 as integer 
num1 = 10
num2  = 20
Msgbox ( Max ( num1 , num2 ))    ' Returns 20


Friday, 28 June 2013

String Functions VB.NET

1. Len Function :- The Len function returns the length of the string variable given as argument to
Len Function. It counts the number of characters a string variable contains and it also counts the white spaces included in the string .
Syntax :- 
Len ( String_Variable )

Example :-

Dim Str as String  = "Hello geeks"
Dim length as integer
length = Len ( Str )
Msgbox (length )

2. Left, Right, Mid Functions :- 
* The Left Function returns specified number of characters from left side of string variable value
* The Right Function returns specified number of characters from Right side of string variable value
* The Mid Function Returns specified number of characters from anywhere in the string variable value. You have to specify from which character position to start and how much characters to take from string.

Syntax :- 
Left ( String_Variable )
Right ( String_Variable )
Mid ( String_Variable )

Example :-

Dim Str as String  = "Hello geeks"
Msgbox ( Left ( Str ))
Msgbox (Right ( Str ))
Msgbox (Mid ( Str , 3, 6 ))

3. LCase And  Ucase  :- The LCase converts a string to all lowercase and UCase Converts a String to all UpperCase Letters.

Syntax :- 
LCase ( String_Variable )
UCase ( String_Variable )

Example :- 

Dim Str as String  = "Hello geeks"
Msgbox ( LCase ( String_Variable ))
Msgbox (UCase ( String_Variable ))

4. Space Functions :- The Space Function is used to put given number of spces within string variable or between two or more string variable values .

Syntax :- 
Space ( value )

Here value specifies the number of spaces you want to put .

Example :- 

Dim Str as String  = "Hello"
Dim Str1 as String = "geeks"
Msgbox ( Str & space ( 1 ) & Str1 )
' It Returns "Hello geeks"

5. String Function :- The String Function Returns a repeating character string of Specified length The specified character will be repeated specified n number of times.

Syntax :- 
String ( n, character )

Example :-

Dim Str as String  = "Hello"
Dim Str1 as String = "geeks"
Msgbox ( String ( 4, "*" ) & Str &  String ( 1, "*" ) & Str1 & String ( 4, "*" ))
' It Returns ****Hello*geeks****

6. Instr Function :- The Instr Function is used to find a Substring within a string variable. This function uses three arguments .first is - starting position in string ,second is name of the string variable , third is Substring that is to be found within the string variable

Syntax :- 
Instr ( starting-position, var-name, Substring )

Example 

Dim Str as String = "Hello geeks"
Dim Substring as String ="gee"
Msgbox ( Instr( 0, Str, Substring ))
' It Returns 9

7. StrReverse Function :- The String Reverse Function returns a string in which the character  order will be reversed as that of order of original given string. It means in string reverse first character of original given string will be placed at last of new string after Reverse operation 

Syntax :- 
StrReverse ( String_variable )

Example :-

Dim Str as String 
Dim Reverse as String
Str = "Hello geeks"
Reverse = StrReverse ( Str )
Msgbox ( "String After Reverse is :- " + Reverse )

Thursday, 27 June 2013

Writing first program in VB.NET


First application will be named

HelloWorld

HelloWorld :-
1.  Open Visual Basic IDE. 


2.  Click File then-> New Project (Ctrl + N) and Select Windows Forms Application

3.  In Name box, write: HelloWorld. Use Browse button to select folder location for this
Application and press OK.  

4.  A new application will be created and Form will appear. Drag and drop the button from the
toolbox on the form. 

ToolBox :- 


5.  Select the form and change Text property of the button to HWGUI.

6.  Select the button and change Text property of the button to Click Me.  Double click the button
to open code page and Add the following line.
          MsgBox("Hello World")

7.  To run the code, press F5 or go to Debug > Start Debugging 

8.  In run mode, Press the button of Click Me  . A popup will appear displaying the message Hello
World

Hello worls Application Look


9.  You can run this application by clicking the exe file from
..\HelloWorld\HelloWorld\bin\Debug folder

CREATING AND USING VARIABLES IN VISUAL BASIC.NET

A Variable is Declared In following format in visual basic.NET :-

Dim variable-name As Datatype

where Dim is a keyword Used For Creating Variable in Visual Basic.
* Variable-name is Name of variable 
* As is a Keywork used to Define Datatype of variable after it
* Datatype is Type of Data That the Data is going to Accept

EXAMPLE 1 :-

Dim msg as string 
msg = "Hello How Are You"
Msgbox(msg)

This code will message "Hello How Are You" With Default Ok Button


EXAMPLE 2 :-


Dim msg as string 

Dim msg1 as string
msg = "Hello How"
msg1= "Are You"
Msgbox(msg + msg1)

This code will message "Hello How Are You" With Default Ok Button

Wednesday, 26 June 2013

Commom Language Runtime (CLR) In VB.NET


It is common managed environment where all the .net programs run. Supports multiple languages and has garbage collection.


The .net Framework provides runtime environment which runs the code and provides services that make the development process easier. This runtime environment in .NET Framework is called as Common Language Runtime. The CLR site at the very heart of managed code. Common Language Runtime is the generalized multi-language, reflexive execution engine on which code originally written in various languages runs. At a higher level, CLR is simply an engine that takes in Intermediate Language instructions, translated them into machine instructions and executes them. 


When compiling to managed code, the compiler translated your source code into Microsoft Intermediate Language , Which is a CPU independent set of instructions can  be efficiently converted to native code. Intermediate Language is a binary assembly language that is compiled at runtime down to whatever machine language is appropriate for the host CPU.

FEATURES OF CLR


1. Automatic Memory Management :- The CLR provides the Garbage collection feautre for managing the like time of object. This relives programmer from memory management task.

2. Standard Type System :- The CLR implement a formal specification called Common Type System . CTS is important part of rules that ensures that objects written in different language can interact with each other.

3. Platform Independence :- The Compiler compiles code language, which is CPU independent . This means that the code can be executed from any  platform that supports .NET CLR.

4. Security Management :- In .Net platform, security is achieved through the code access security {CAS} . In the model, CLR enforces the restriction an managed code through the object called "permissions". The CLR allows the code to perform only that task for which it has permission. In other words, the CAS model specifies what the code can access instead of specifies who can access resources.

BENEFITS OF CLR


1. Performance improvement
2. The ability to easily use components developed in other languages.
3. Extensuble types provide by library. 
4. New language features such as inheritance, interfaces etc.
5. very strong type safety.
6. Syntax and semantics are similar to C or C++

Monday, 24 June 2013

Registration Instructions for Visual Basic 2010 Express Software

Registration Instructions for Visual Basic 2010 Express Software

Registration of the Visual Basic 2010 Express software is required by Microsoft within 30 days of installation.

Registration is free!

If you encounter difficulty while registering, please review these two sources of information:

1.  For official Microsoft support regarding registration, please see their Registration FAQ:

2.   You can review many questions and answers at the Visual Basic Express Edition forum:


IMPORTANT THING TO NOTE

During the registration process, you must use Internet Explorer as your default browser.  If you areusing Firefox, Chrome, or another web browser, you may experience difficulty or hangs during theprocess!  If Internet Explorer is not your default browser, please follow the instructions below.  You can revert to your preferred browser after the registration is complete.

1.  Close all running Visual Studio Express Editions programs

2.  Start Internet Explorer

3.  Go to Tools  Options and select the Programs tab

4.  Enable the checkbox for "Internet Explorer should check to see whether it
is the default browser" or click on the “Make Default” button.

5.  Click OK

6.  Close all instances of Internet Explorer

7.  Start Internet Explorer again. If asked whether you want to set IE to the
default browser, choose “Yes”.

8. You will need a Windows Live ID (or MSN Hotmail, MSN Messenger, or Passport account) in
order to register.  You do not have to use your primary or personal email; any valid account will do.

9. You can even create a temporary account just for this purpose!
To register, from within your Visual Basic Express Edition software package, click on the “Help”
menu and then “Register Product”. You should see the following screen:


10. Click on the button that says “Obtain a registration key online”. Your Internet browser software should open and show the following page:

11. Microsoft requires a MSN Hotmail, MSN Messenger, or Passport account (a Windows “Live” ID) in order to register the product.  If you do not already have one of these email addresses, or you are not comfortable using your existing personal account, then you can create a new email address (clickthe “Sign up now” button) just for this registration.  

12. Once you click the “Sign In” button you will see a fairly lengthy page asking a variety of survey-type information.  Only a few minimal fields are required, and none of the information is verified by Microsoft.  Fields marked with the ‘*’ are required.  For the “My E-Mail Address” you can use the same email
you signed in with.


13. Scroll down to the bottom filling in any required fields.  Un-check the two “Communication
Preferences” boxes and click “Continue”. 

14. The next screen may display an email verification message depending on the email address you used.You can ignore this page and click “Continue” at the bottom if it appears!
The next page shows your registration key.  The sample key below WILL NOT WORK for your
computer, it is for example only.  You must complete this registration process to get your unique
key.  
The page shows the remaining 3 steps necessary to finish.


15. Copy the registration key displayed on the page. If you do not have the Registration Window stillopen on your screen, choose “Register Product” from the Help menu in the Visual Basic software. Paste the registration key into the edit field and click “Register Now”

That’s it! You have completed the Visual Basic 2010 software registration!

Saturday, 22 June 2013

Installation of Microsoft Visual Studio 2010


Microsoft Visual Studio is a Software Development Tools Kit Developed By "Microsoft Corporation" . Microsoft Visual studio similarly to its previous components consist of Integrated
Development Environment ( IDE ) . It can used to Develop both   Graphical user interface ( GUI ) and console applications . 

It can be used for developing both web applications and Desktop Applications. Visual Studio consist of Multiple language support . It consist of code-Editor that consist of most demanding and worldwide popular intelliSense feature. It Supports following languages :-

* Visual Basic
* Visual C#
* Visual C++
* Visual J#

It also supports most popular web languages like :-

* HTML ( Hyper Text Markup Language )
* XML ( Extensible Markup Language )
* Javascript
* CSS ( Cascading Style Sheets )
* Jquery

You can Easily Download Microsoft Visual Studio 2010 from link below :-

Microsoft Visual Studio Versions                 Framework Support
* Microsoft Visual Studio                           Without .NET Framework Support
* Microsoft Visual Studio 97                      Without .NET Framework Support
* Microsoft Visual Studio 6.0                     Without .NET Framework Support
* Microsoft Visual Studio.NET 2002          With .NET Framework 1.0
* Microsoft Visual Studio.NET 2003          With .NET Framework 1.1
* Microsoft Visual Studio.NET 2005          With .NET Framework 2.0 , 3.0
* Microsoft Visual Studio.NET 2008          With .NET Framework 2.0 , 3.0, 3.5
* Microsoft Visual Studio.NET 2010          With .NET Framework 2.0 , 3.0, 3.5 , 4.0
* Microsoft Visual Studio.NET 2012          With .NET Framework 2.0 , 3.0, 3.5 , 4.0 , 4.5


Hardware Requirements For Microsoft Visual Studio 2010


Processor Requirement
* You must Require Processor from or higher than Pentium Processors Family with minimum
Clock speed of 2.6 Ghz.

RAM Requirement
* you must Have minimum Primary memory or Random Access memory (RAM) of 4 GB for frequent speed of Microsoft Visual Studio 2010 software

Hard Disk space Requirement
* You should install the Microsoft Visual Studio 2010 in the Partition or System Drive that have
minimum or Required space of 50 GB

GPU Requirement
* You require GPU that supports minimum of DX9


Software Requirements For Microsoft Visual Studio 2010

Operating System Requirement
* You must have An Operating System of any of Versions of Microsoft Windows . It could be from list of following versions of Microsoft Windows :-

-* Microsoft windows XP Professional Service Pack 3
-* Microsoft windows Vista Professional
-* Microsoft windows Vista Basic Home
-* Microsoft windows 7 Professional
-* Microsoft windows 7 Ultimate
-* Microsoft windows 7 Basic Home


Virtualization Requirement
 * You can also Run Microsoft Visual Studio 2010 on Virtual Machine . It could Be :-

-* Vmware workstation

-* Microsoft Virtual PC

-* Windows Virtual PC
Download Windows Virtual PC
 

Step By Step Guide To Install Microsoft Visual Studio 2010


1. Double Click on Microsoft Visual Studio 2010 Professional Setup . It will open Set-up window. 
2. Choose "Install Microsoft Visual Studio Test Professional 2010"


3. Now  the Microsoft Visual Studio 2010 installation Wizard  actually starts . It also consist of check Box that ensures that you want to send information to Microsoft about your experience of Microsoft Visual Studio 2010. Now click on Next Button

4. Now Next step contains the license terms for Microsoft Visual Studio 2010 Software.

5. Click on I have read and accept the license terms Radio Button and Click on Next.

5. Now In next window you can choose which component you want to install .In Disk space requirements Group Box when you select any components it shows the total empty disk space you need for all components you want to install

6. Provide the Product install Path . like :- "c:\Program Files\Microsoft Visual Studio 10.0\"


7.  Now Finally Click on Install Button 


8.  Now it start installing all Microsoft Visual Studio components as you can see
in image below. It will take long time for installing all  .NET or Visual Studio
 Components.


9. The Microsoft Visual Studio 2010 may Restart during installation completion Process. It restarts the computer for installing Microsoft Visual studio in steps so that it contains all files and components and none will be missing .


10. After Installation It shows message " Success Visual Studio Setup is complete"

Friday, 21 June 2013

INTRODUCTION TO VISUAL STUDIO 2010


Visual Basic 2010 is the latest version of Visual Basic launched by Microsoft in 2010. It 
is almost similar to Visual Basic 2008 but it has added many new features. Visual Basic 
has gone through many phases of development since the days of BASIC that was built 
for DOS. BASIC stands for Beginners' All-purpose Symbolic Instruction Code.
The 
program code in Visual Basic resembles the English language. Different software 
companies had produced many different versions of BASIC for DOS, such as Microsoft 
QBASIC, QUICKBASIC, GWBASIC, and IBM BASICA and more. Then, Microsoft 
launched the first graphical BASIC, Visual Basic Version 1 in 1991. It is GUI based and 
especially developed for MS window. Since then Microsoft slowly phased out the DOS 
versions of BASIC and completely replaced them by Visual Basic.  
Visual Basic was initially a functional or procedural programming language until the 
popular Visual Basic 6. Then, Microsoft transformed Visual Basic into a more powerful 
object oriented programming language by launching Visual Basic.Net, Visual Basic 
2005, Visual Basic 2008 and the latest Visual Basic 2010. Visual Basic 2010 is a full-
fledged Object-Oriented Programming (OOP) Language; it has caught up with other 
OOP languages such as C++, Java, C# and others. However, you do not have to know 
OOP to learn VB2010. In fact, if you are familiar with Visual Basic 6, you can learn 
VB2010 effortlessly because the syntax and interface are almost similar. Visual Basic 
2010 Express Edition is available for free download from the Microsoft site as shown 
below:

The Start Page  


When you launch Visual Basic 2010 Express, you can see the start page of the 
Integrated Development Environment, as shown in Figure :-


The IDE consists of a few panes, namely:   

   
• The Recent Projects Pane- it shows the list of projects that you have created 
recently.  
  
• The Get Started Pane- It provides some helpful tips so that you can quickly 
develop your new application. 

• The Latest News pane- It provides latest online news about Visual Basic 2010 
Express. It will announce new releases and updates. 
 Besides that, it also shows two icons, New Project and Open Project

The New Project Dialog  

 When you click on the New Project icon, the Visual Basic 2010 New Project dialog will 
appear, as shown in Figure :-


The Dialog box offers you five types of projects that you can create. They are Windows 
Form Application, WPF Application, Console Application, Class Library and WPF 
Browser Application. As we are going to create a standard Windows application, we will 
select Windows Forms Application. At the bottom of this dialog box, you can change the
default project name WindowsApplication1 to some other name you like, for example, 
MyFirstApplication. After you have renamed the project, click OK to go into the 
Designer interface. 
The Designer Interface  
The VB2010 IDE Designer interface is shown in Figure 1.3. The Designer consists of 
the Menu bar, the Toolbars, an empty Form, the Solution Explorer and the 
Properties Window.  

The VB2010 Designer environment that appears on your PC or laptop might not be the 
same here, depending how you customize it. You can customize your interface by 
dragging the windows and dock them or let them float. You can also hide them. To dock 
a window, you drag its title bar and drag it to the side, top or bottom of the workspace or 
another window. In Figure shown below, we have dragged the Solution Explorer and the 
Properties Window to the side and docked them. You can also resize the docked 
window by dragging the side of the window. To free up and float the docked window, 
you just drag its title bar and move it away from the edge of the workspace. 
If you do not see a particular window such as the properties window, you can click on 
the View menu and click the name of the window, that particular window will appear. 


 Form-

The Form is the first place to build your application. It is the place to design the user interface. 

 Solution Explorer -

The solution explorer displays a list of projects, files and other components that you can easily browse and access.

 Properties Window-
 This is the place to set the properties of the objects in your application. The objects include the default form and the controls you place in the form. We will learn more about setting properties later.  

Thursday, 20 June 2013

Introduction To C++ Programming Language


C++ is object oriented programming language . But in this we can do Structured Programming also. Initially named "C with Classes" . C++ was developed By Bjarne Stroustrup at Bell-Laboratories in 1980s . Stroustrup take the best feature of simula 67 and C, and designed a language which support object oriented programming feature.
Therefore we can say C++ is extension of C language since the class was a major addition to original C language stroustrup called the new language "C with Classes" . However in 1983 the name was changes to C++. The idea of C++ comes from C increment operator ++ . Therefore as C++ is next version of C as +1 So it is named as C++ .

C++ is actually upper version or superset of C programming language . So amost all the Syntax or variable declaration, loops , conditional statements , Switching Statements etc are same .

C++ allows programmers to build large and complex applications in useful and efficient way . It enables programmers to improve the quality of code produced , thus making code easier to write . 


Features Of Object Oriented Programming

1. Classes And Objects


Classes

A class is collection heterogeneous collection of data. The word "heterogeneous" means class consist of data of different data-types binded together in single entity.


A class is a user defined data type which holds both the data and function. The data inside the class are called member data and the functions are called member function . 

Objects

An Object is an entity that has state, behavior and identity. Objects are used to model real world entities that we find in everyday life . Some common examples of objects are book, clock, apple, car etc .

Every Object will have data structures called attributes and behaviour called operations . Here, behaviour are functions defined in classes of which object is made . These functions defined the code to be executed or task to be performed.


EXAMPLE :-


Class My-Class

{
public :
char name [ 20 ];
int age ;
int salary ;

public :
void getdata ( ) ;
void showdata ( );
};

void main ( ) 
{
My-Class My-obj ;               // Creation of object of class My-Class
getch ( ) ; 
}


2. Encapsulation 


Data Encapsulation is a mechanism that binds together data and functions in single entity. OOPS provide this feature this was not availaible in C programming language . Data Encapsulation generally provide the feature to contains both data members and member functions in single entity called class. 

Class My-Class
{
public :
char name [ 20 ];                  // Data Members 
int age ;
int salary ;                                       
                                                          + public :
void getdata ( ) ;                  // Member Functions
void showdata ( );
};


3. Data Hiding


Data Hiding can be defined as mechanism of hiding the data of class from outside world means from other classes or ouside class so that any access to class intentionally or unintentionally cannot access the data . The data can only be accessed only through the object of the class.

Data Hiding is mainly implemented by using Access specifiers . The main access-specifiers used in  
C++ are :-

* Private :- If a variable is declared with access-specifier then It is private data member of that class  and it cannot be accessed outside class directly . For Accessing Private data member outside class we have to use these Private data member in public Member function and then by calling these member function with help of object we can in this way inderectly access Private members

* Public :- Public Data-Members and Member-Function have Lifetime access through the program Execution . The variable that are declared as public can be directly accessed outside the class they belong to . They can be used outside class by calling them through object of that class .Public data members have less security as compared to Private as these can be accessed outside class .

* Protected :- Protected Data members and Member-Functions are used mainly in case of Inheritance. In inheritance if data-member is declared as Protected then it can be accessed through public Member function in Derived class and If this class is inherited by another class then that derived class can also used this protected member


4. Inheritance 

Inheritance is most powerful feature of Object Oriented Programming after the concept of Classes and objects . Inheritance is the process of creating a new class, called derived class from existing class called Base class The Derived class inherits some or all the traits from base class and also add new features to derived class . The base class is class is remained unchanged during this process . 

Inheritance Consist of Following Types :-

* Single Inheritance
* Multiple Inheritance
* Multilevel Inheritance
* Hierarchical Inheritance
* Hybrid Inheritance


5. Polymorphism 

Polymorphism is a very powerful concept that is used for allowing designing of complex applications . The word Polymorphism is composed of two words "poly" + "morphism" . The word "Poly" means many and "morphism" means forms . So, Polymorphism means the ability to take many forms but technically different tasks . In other words, Polymorphism can also be defined as one interface that can be used to perform related but different tasks . 

Polymorphism has two types :-

1. Compile Time Polymorphism :- It can be done by :-

* Function Overloading :- The function overloading is the concept of using no of functions that perform different types of tasks But using same name for all functions . The same function can be used for all functions But they should be defferenciate by passing arguments of different data-types in each function.

* Function overloading :- It is process of performing general or comples Arithmetic or other operations on Data of Non-Basic Data-Types like addition of objects of class etc

2. Runtime Time Polymorphism :- 


* Virtual Function :- Virtual Functions are defined in base class in public section and they provide mechanism by which the derived class can override it . These functions are bound dynamically .

Wednesday, 19 June 2013

Create Functions in SQL

Functions provide a good way to group some set of statements under a particular valid Function -Name that can used in various portions in Program . Functions allows us to use particular set of statements that will be used a number of times in different portions of program by single name. A particular set of statements used to perform specific function and
we know these statements will be repeatedly used in various parts of program then instead of increasing the Redundancy of code or repeated code in the program  we have placed all this code single time in a function we always call that function whenever we requires that code

SYNTAX :- Syntax To Create A function in SQL :-

Create Function Function-Name ( @Parameter-Name  Parameter-value=type )
returns  Return-Type
as
begin
               Set
                      Of
                          Statements
end

* Here, Create and Function  are keywords that are reserved to create functions in Structured Query Language.
* Function-Name could be any legal group of characters . It must consist of single word . If we want to use more than one word then they are joined using Underscore sign.
* Returns statement tells the type of values the function will return to calling procedure
*  as is also a keyword used to define which work function have to perform
* The work that the function has to perform  is placed as the set of statements under Begin and End Keywords.

CALL FUNCTION IN SQL  SYNTAX :-

Select dbo.function-Name( parameter list )
                OR
select function-Name( parameter list )

EXAMPLE :-

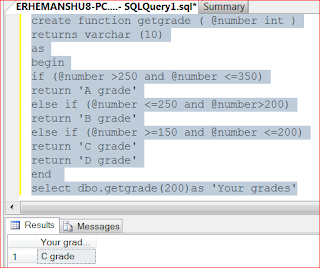
QUERY 1 :- Create a function to know your grade in SQL by Entering numbers

create function getgrade ( @number int )
returns varchar (10)
as
begin
if ( @number >250 and @number <=350 )
return 'A grade'
else if ( @number <=250 and @number>200 )
return 'B grade'
else if ( @number >=150 and @number <=200 )
return 'C grade'

return 'D grade'           

end

select dbo.getgrade(200)as 'Your grades'

DESCRIPTION :-

* Here, Create and Function  are keywords that are reserved to create functions in Structured Query Language.
* getgrade is the name of function . It consist of one Parameter of integer Type
                     
                                         @number int 

* Here @number int is the parameter of getgrade function
* In SQL (Structured Query Language) @ is used for declaring the temporary variable and int tells the type of variable is it that defines the type of data it can store.

                                        returns varchar (10)

* Returns statement tells the type of values the function getgrade will return to calling procedure . Here, Varchar followed by returns so getgrade function will return a varchar value that can have maximum length of 10 characters

*  as is also a keyword used to define which work function have to perform

* The work that the function has to perform  is placed as the set of statements under Begin and End Keywords.

                               select dbo.getgrade(200) as 'Your grades'

* When we Execute this statement  it will first call getgrade function . As getgrade function has one parameter @number and we are also calling the function getgrade with a integer value '200' @number will be assigned with '200' value 

*  Now control goes through if -- Else if statements and return the value according to the value assigned to function parameter @number

* @number=200 so it returns C grade


OUTPUT :-


QUERY 2 :- Create a function to Display Addition of Two Numbers without using third variable

create function ADDITION(@number1 int, @number2 int)
returns int
as
begin
return (@number1 + @number2)
end

select dbo.ADDITION(5,6) as RESULT


OUTPUT :-


QUERY 3 :- Create a function to Display Addition of Two Numbers using third variable

create function ADDITION1(@number1 int, @number2 int)
returns int
as
begin
declare @c int
set @c = @number1 + @number2
return @c
end

select dbo.ADDITION(5,6) as RESULT


OUTPUT   :-


Declare Variable in SQL


VARIABLES :- Variables are particular amount of memory area that are used to store the data values required to get producing the desired output from the program or SQL query . But Before using or allowing these variable to hold the specified data values we must declare them . The Declaration Statement of variable also tells the type of data that the variable will hold.


In SQL Variables can be declared with keyword Declare as shown below :-

1. DECLARING SINGLE VARIABLE AT ONE TIME

                                Declare @Variable-Name  Data-Type

* HERE, DECLARE is a keyword that tells the interpreter that we are going to create variable

* DECLARE keyword is followed by Variable-Name that is valid name in which the value assigned to variable will be stored. Variable name is precedded by '@' 

* Data-Type is used to specify the type of value that the variable will hold

EXAMPLE :-

               Declare @firstname varchar(30) 
               Declare @midname varchar(20)
               Declare @lastname varchar(10)

INITIALIZE VARIABLES IN SQL

After a variable is declared now the memory area is allocated to it. Now its time to assign value or intialize value of variable For Initializing variable in SQL we use a special keyword 'set' or 'select'

Before initializing the variable it consist of NULL value  . If you try to print value of variable without initializing it . Then it will print some Garbage value .

SYNTAX :- 

set   @variable-Name  =  variable-value
                          OR
select @variable-naem  =variable-value

* Here, 'set' or 'select' are keywords used for initializing values of variables
* variable-Name is name of variable . It should be same as you have given in declaration section
* variable-value is desired value you want to assign to variable

EXAMPLE :-

               Declare @firstname varchar(30) 


               Declare @midname varchar(20)

               Declare @lastname varchar(10)

               set @firstname  =  'geeksprogrammings'

               set @midname   =  '@blogspot'

               set @lastname   =  '.in'


PRINT VARIABLE VALUES 

print the variable values means to display the data that is variable is holding and display it to computer screen 

EXAMPLE :-

print @firstname
print @midname
print @lastname

FINAL OUTPUT :-


2. DECLARING  MULTIPLE VARIABLE IN SINGLE LINE 

 Declare @Variable-Name1  Data-Type , Variable-Name2  Data-Type -------UPTO N VARIABLE

* HERE, DECLARE is a keyword that tells the interpreter that we are going to create variable


* DECLARE keyword is followed by Variable-Names that is valid name in which the value assigned to variable will be stored. Variable name is precedded by '@' 


* In SQL we can create multiple number of variable in single line by separating them by commas ( , ) . 


* Data-Type is used to specify the type of value that the variable will hold


MULTIPLE VARIABLE DECLARATION EXAMPLE :-

Declare @firstname varchar(10) , @midname varchar(10), @lastname varchar(10)

INITIALIZE MULTIPLE VARIABLES IN SINGLE LINE IN SQL

Initialization of variables in this section is similar to intializing them is previous section . But if we want to  initialize multiple variables in single statement that does not supported by 'set'  keyword as it is only used for initializing values of single variable at one line. So to fullfill our task we will use select keyword as shown in example below.


                     select @variable-name1  =variable-value , @variable-name-n = variable-value


* Here, 'set' or 'select' are keywords used for initializing values of variables


* variable-Name is name of variable . It should be same as you have given in declaration section

* variable-value is desired value you want to assign to variable

INITIALIZE MULTIPLE VARIABLES IN SINGLE LINE IN SQL
EXAMPLE :-

Declare @firstname varchar(10) , @midname varchar(10), @lastname varchar(10)
select @firstname  =  'geeksprogrammings' , @midname   =  '@blogspot' , @lastname   =  '.in'

PRINT 
MULTIPLE VARIABLE VALUES IN SINGLE LINE IN SQL

                                          print @variable-name1 + @variable-name2 + @variable-name-n

print the variable values means to display the data that is variable is holding and display it to computer screen 

PRINT MULTIPLE VARIABLE VALUES IN SINGLE LINE IN SQL
EXAMPLE :-

print @firstname
print @midname
print @lastname

FINAL OUTPUT :-